There is nothing more frustrating than chasing a leak on the exterior of your building. Many times we receive a call where the property manager has spent a lot of time, effort, and money trying to stop moisture infiltration. Ultimately they give up and decide to bring in an expert to try to stop the issue. One of the first questions we ask is “where is the water coming from?” The most common reply is “well I thought it was this, but that didn’t work, so I tried this” and so on. The most important thing about stopping a leak is finding the source of the leak. Often, the best solution is to try to reproduce the leak by methodically water testing and isolating the source.
What is a Water Test?
The test is typically performed using a garden hose and a spray nozzle to apply water at a consistent rate for a specified period of time. Other tests may involve a calibrated nozzle apparatus or vacuum chambers. Water is applied from the exterior by one technician and another technician should be stationed on the interior to observe the leak. Interior access might require the removal of ceiling tiles, drywall, or other items as required to clearly see the location of the infiltration. The technician on the exterior may need to be on the roof, scaffold, or in an aerial lift if required to test the identified areas.
The Challenges
The first step is to evaluate the type of structure and understand the challenges of producing a conclusive result. The challenge with finding a leak is mainly due to the nature of water and the way it moves. Just because there is a drip in one corner of the building doesn’t mean the leak is right above it. Sometimes the water comes from across the building and travels until it finds a place to drip. In a solid masonry structure, the moisture may have to soak into the wall to the point that it finally drips on the interior. Sometimes the moisture doesn’t even drip but rather the moisture infiltration is indicated by peeling paint or deteriorated plaster. These cases may take hours before a result is visible and usually result in an inconclusive test.
Performing the Water TestPerforming the Water Test
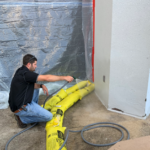
The water should be applied in a methodical manner typically starting from the bottom and moving upward. Careful consideration should be given to whether the current test could invalidate subsequent tests. For example, if you spray the top of a window to test it, then the water will run down the window and over the window sill. If you find that it leaks inside near the sill, you won’t be able to determine if it comes from the top where you sprayed the water or if it came from the sill where the run-off soaked it. Rather, first, spray the sill to isolate it, then move upward to the top of the window. Other methods of isolating tests include using Visqueen to mask windows or adjacent surfaces, or sandbags to divert or control run-off on the ground. The most important factor in a successful test is the ability to definitively isolate what caused the leak without confusing or invalidating other tests.
Compiling and Presenting the Results
When leaks are produced, the test and result must be carefully documented. Often, there is a written component and a visual component such as pictures or illustrations. The information gathered in the field should be clear enough that a complete report can be written. The report should clearly define the hypothesis/theory, the method used to test it, and the result. If the results or conclusive, the report should include recommendations for a repair program.
If you have a leak on your building that you have been chasing, please contact us for an assessment. We will review the circumstances and determine whether a water test is appropriate.